If you have been involved in software development, you’ve probably heard of Git, GitHub. In this article, I will discuss what is GitHub and how it works with CloudPages.
GitHub is a cloud-based platform that allows developers to collaborate and track changes to code. If you really want to understand the concept of GitHub, it’s important that you know two connected principles.
- Version Control
- Git
Table of Contents
What Is Version Control?
Version control lets you change files as often as you want without the risk of losing previous versions. If you are a graphics or web designer and you want to keep, manage, and use every version of an image or layout, storing that information in a Version Control System(VAS) is a very wise thing to do. With version control, you can go back to any previous revision of your project, revert changes if they cause errors, see the history of a file, and more.
What is Git?
Git is an open-source version control system created by Linus Torvalds in 2005. Git is a distributed version control system. This means that the entire codebase and history are available on every developer’s computer, which allows for easy branching and merging.
Now What Is GitHub?
GitHub is a company that allows developers, designers, and other professionals to collaborate on software projects. Essentially it makes it easier for them to use Git for version control and collaboration. GitHub is a Git repository hosting service. While Git is a command-line tool, GitHub provides a Web-based graphical interface. Some of the collaboration features include wikis, task management tools, and access control.

GitHub was launched in 2008, after spending a brief period in beta. It’s a Git-based software repository that quickly became the most popular version control system on the market – for its safety and user-friendliness. By the year 2021, GitHub has more than 55 million users, and more than 228 million repositories.
GitHub Repository
A repository is a place where your project files reside with a detailed history about who’s editing and when. While GitHub offers two types of repositories (private and public), there are unlimited free private repositories for you to use on GitHub. Also, you can share individual access to your code with others or manage the ownership of your repository.
GitHub allows you to collaborate and make a team with developers around the world and work with them. You can get feedback and solve the issues with different responses.
How it works with CloudPages?
In CloudPages, we have introduced the Git Manager feature. Although this is a very rich and advanced feature, many users do not know about this feature. You can use Git manager and attach Git repositories to your web application folders.
In this section, I will show you how Git Manager works on CloudPages. follow step by step procedure:
Go to the server Dashboard and click on List Websites on the sidebar.
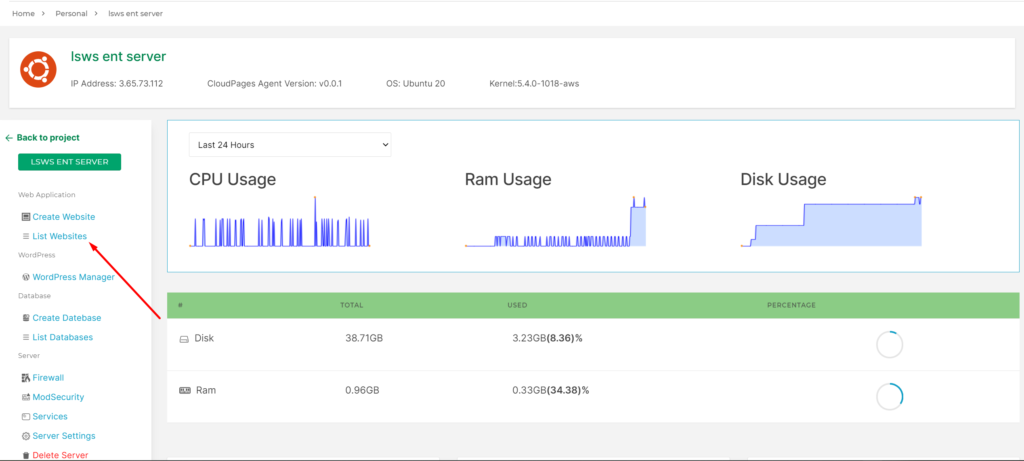
Select Website
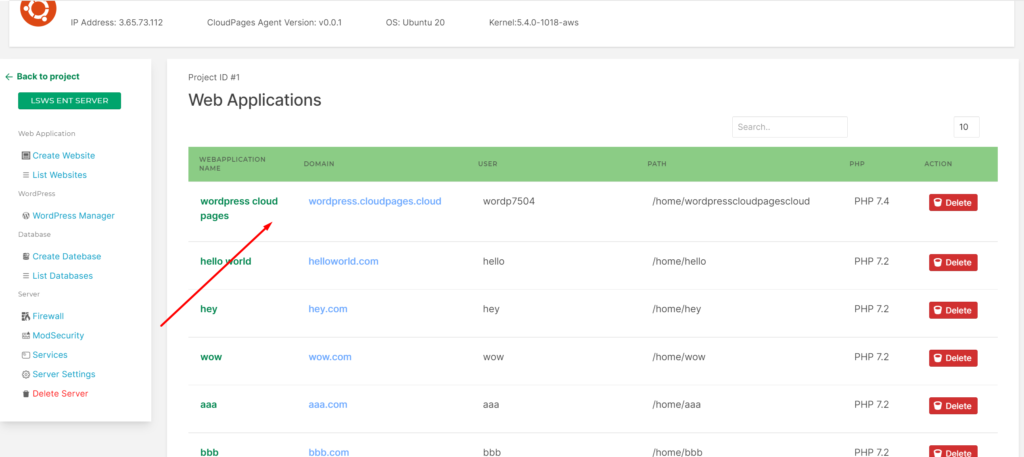
Select the website for which you want to access the Git Manager
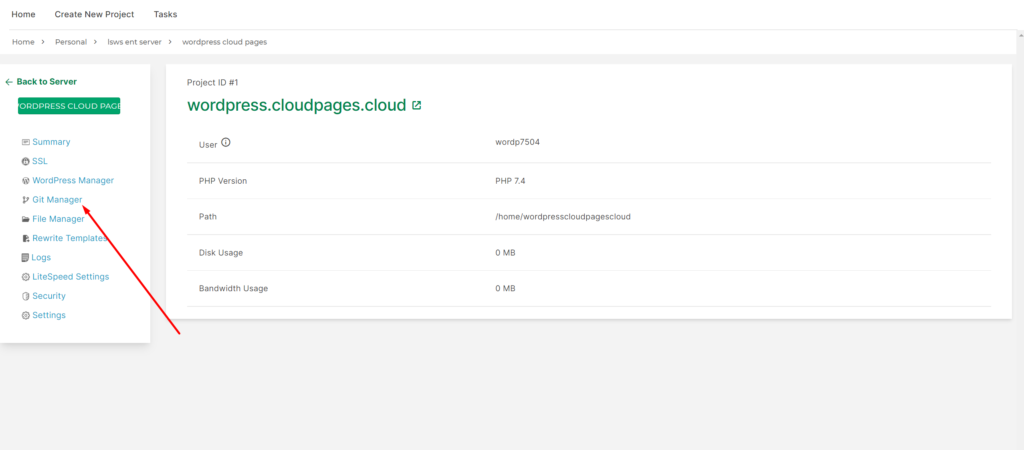
Click on Git Manager on the sidebar of your website dashboard.
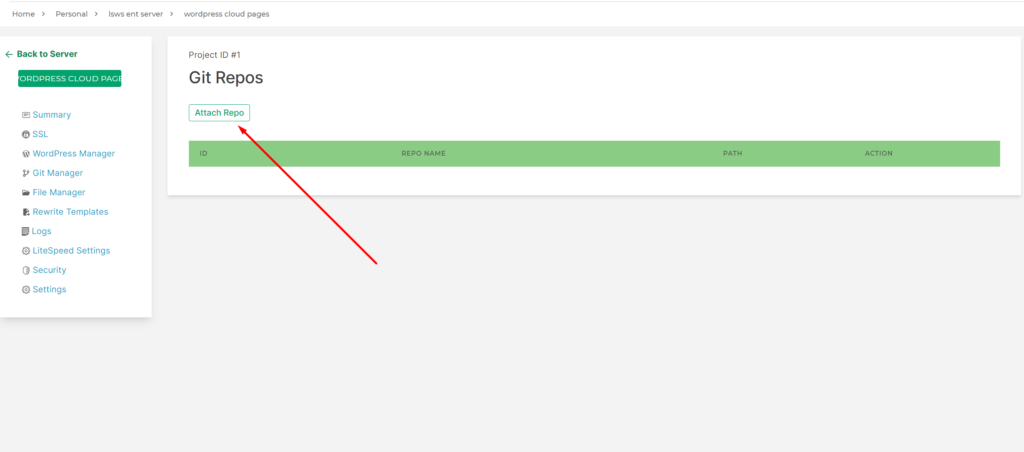
Git Manager
Click on Attach Repos for attaching a new repository.
Add SSH/Development key to GitHub
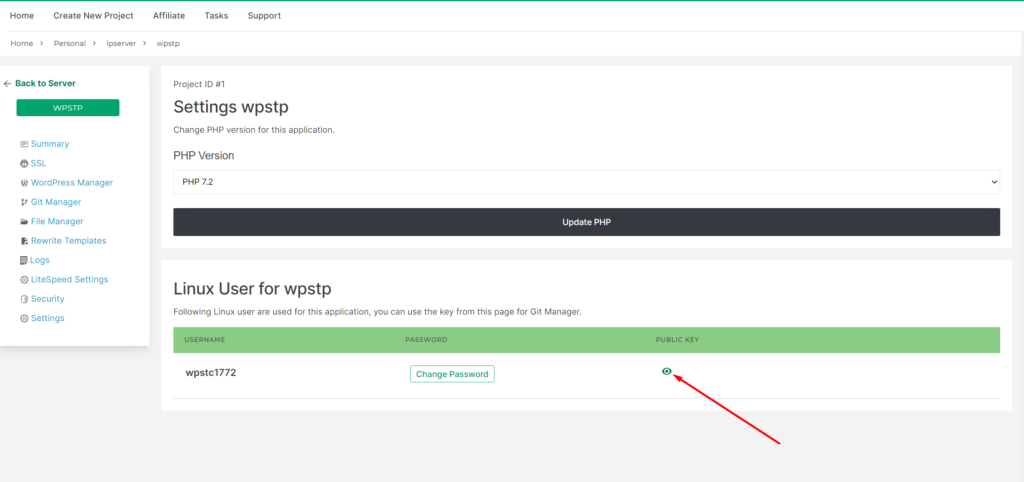
Once you click on attach repo you can see that attach repo page will be open on your screen. The first thing to do is you must place your development key into your Github account. You can get the key from the settings page.

After navigating to the settings page, click on the eye icon to see your public key.
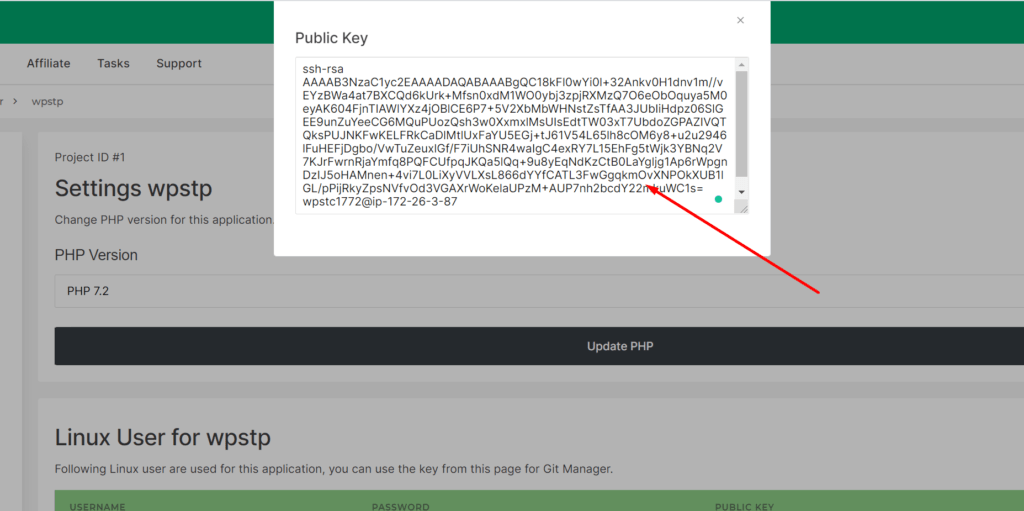
Once you click, a popup window will open and you can see your public key, copy that key.
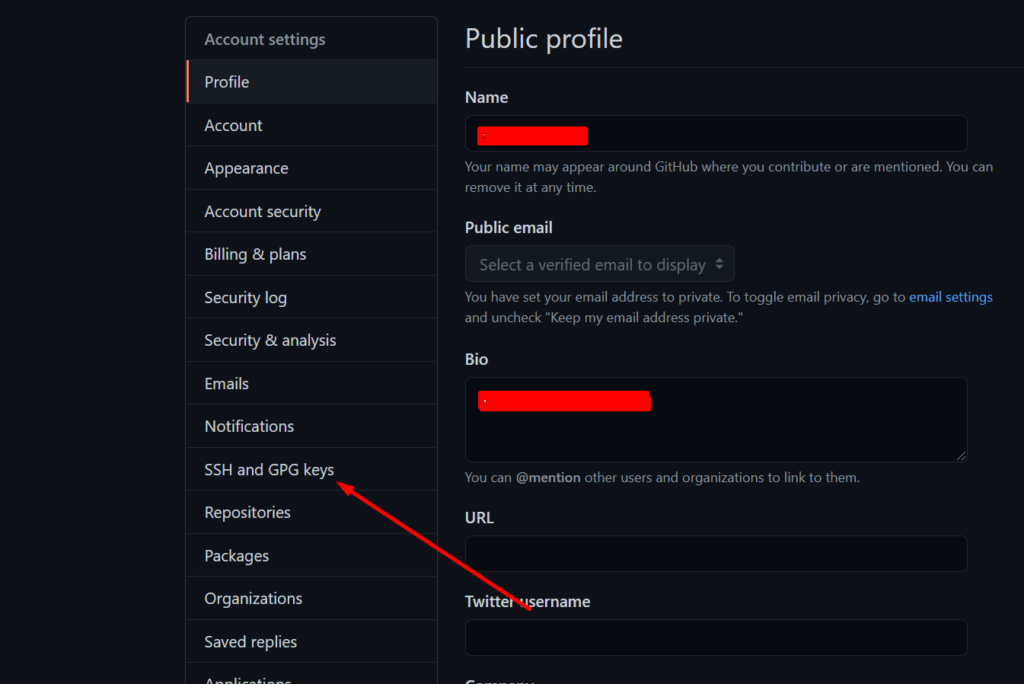
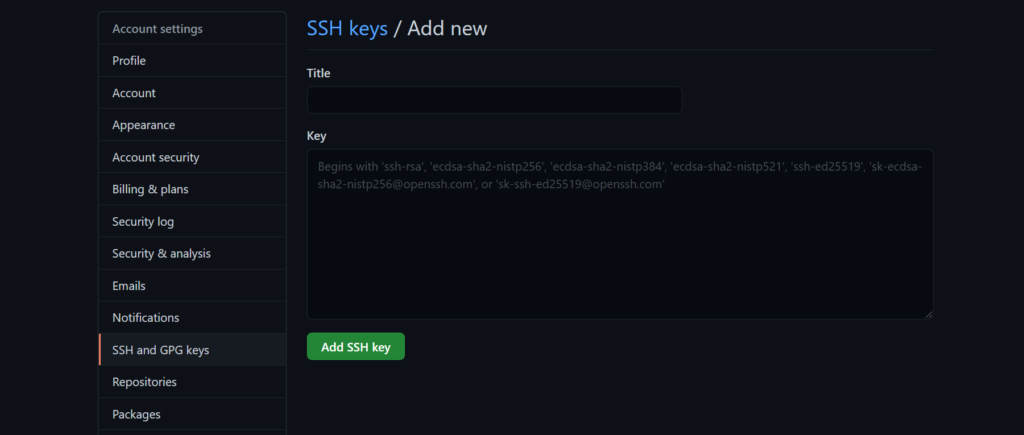
Now go to the github.com login to GitHub account, go to the account settings, and then SSH and GPG keys.
Click on “New SSH Key”.
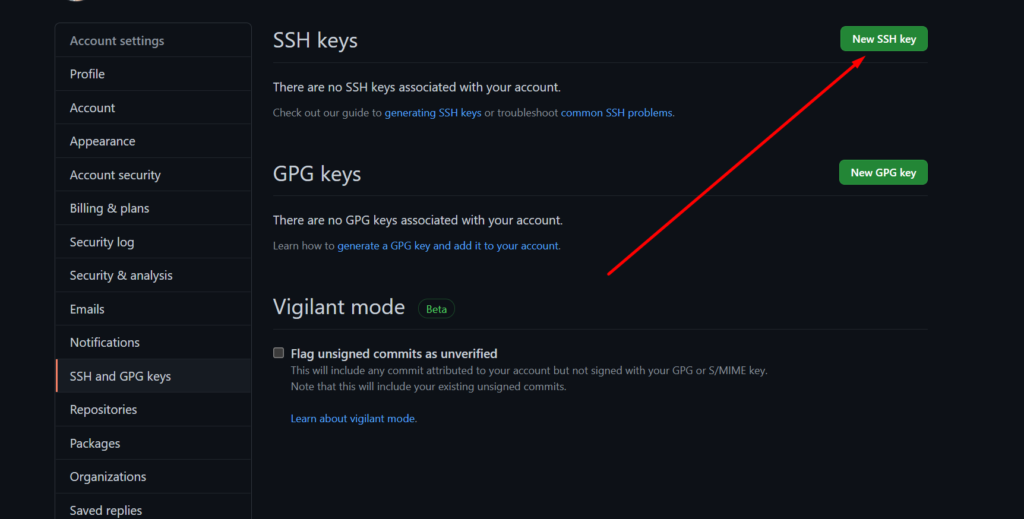
Enter any title of your key. In the key section, paste the key (that you have copied from your settings page) and click “Add SSH key”.
Attach Repo
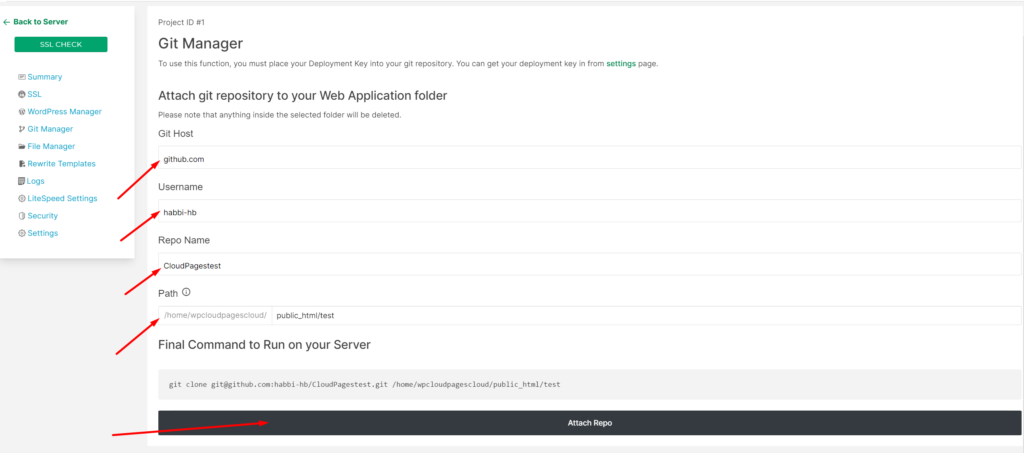
Once you add the key, then you can attach the repo easily, Add the required data:
- Git Host: Add the git host, for example, if you are using Github for your repo use github.com and if you are using Gitlab enter gitlab.com (In this case it will be github.com as this article discussess Github)
- Username: Enter you git username.
- Repo Name: Provide your repo name (From where you want CloudPages to pull code).
- Path: Add the path from your server. (This can be any path)
Like /yourwebsite/home/public_html
After adding the required data press the Attach Repo button
This process takes some time to Attach repo

Once done, repo is successfully attached.

What is WebHooks?
Webhooks play an important part in automation.
To get real-time updates from your GitHub repositories, you can set webhooks on the GitHub side. You can configure webhooks to listen for specific events like pushes, issues, or merge requests.
Once you configure a webhook, as soon as someone commits or pushes code to your repo CloudPages will automatically run git pull on your repo.
You can create up to 20 webhooks for each event on each installation target. Webhooks can be used to execute code whenever someone performs a specific action. For example, that can include:
- A repository is pushed to
- A pull request is opened
- A GitHub Pages site is built
- A new member is added to a team
Setup WebHooks
Once you Attach the repo ClouPages gives you a Webhooks URL. You can add this URL to your GitHub account for real-time updates.

Copy this Url and add it to your repo Webhook section,
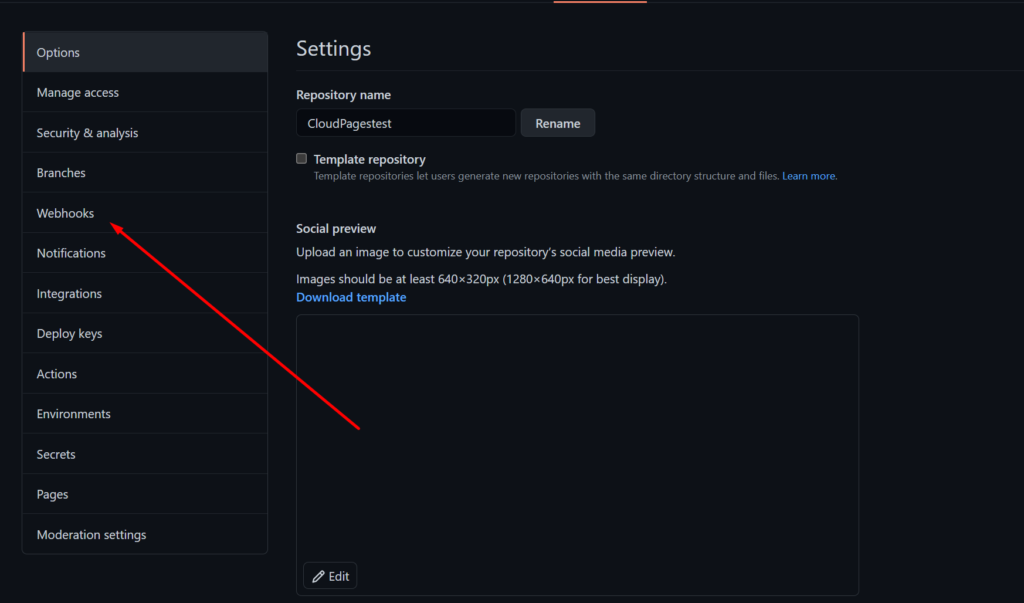
Go to your Github account, Select the repo that you want setup Webhooks for, and then goto to Settings of the repo

Click on Webhooks in the sidebar of settings.
Click on Add webhook button

On the Webhooks page, fill in the Payload URL with the URL that you copied above from CloudPages, choose Application/JSON as Content-type and click on Add webhook.
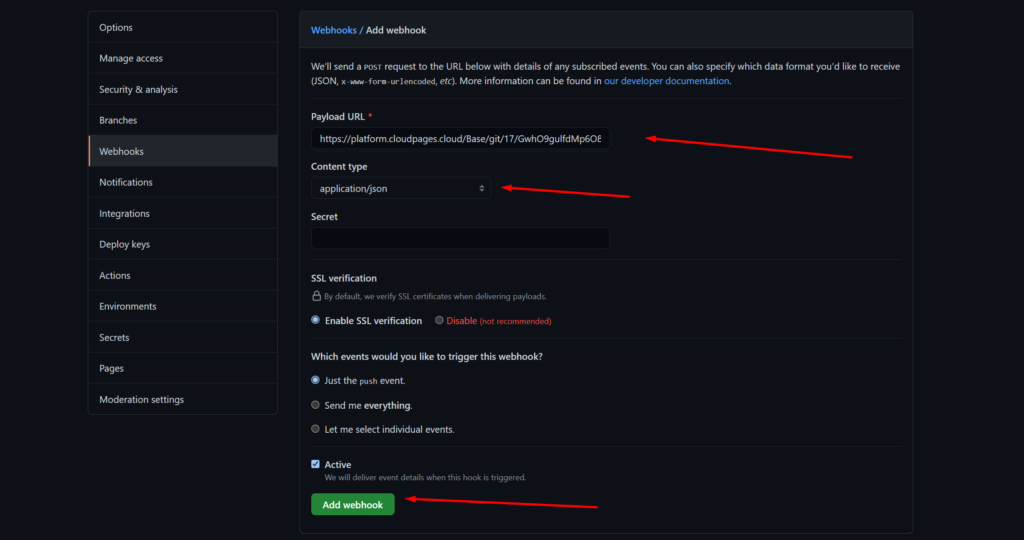
Which events would you like to trigger this webhook for?
Better to select the push event only so that Github triggers this webhook when someone pushes to your repo.


